Oh-my-zsh
Shell
I still recall like 20 years ago, when I was using only the Linux console. Then I upgraded it to framebuffer and suddenly I got much higher resolution in console and it was a game changer. I was using mainly ssh, vim, mutt, bitchx and links (not necessarily in that order)… but for viewing a (funny) pictures from my friends I was forced to switch to X11 and start some picture viewer or open Netscape Navigator to see a graphical web page. It wasn’t very convenient, especially the copy&paste between the console and X11 wasn’t working so I had to insert the URL to file and then open it to see and use the URL.
Over the years I moved to GUI, to be more specific to macOS and the terminal was in the second line. One of the reasons was, that I don’t have any servers that I need to manage. These days I’m trying to be more familiar with the DevOps world so I’m back to the terminal.
Oh-my-zsh
For many years my shell of choice was BASH, I was using bash-competition, different aliases, custom functions, customized prompt and so on. At this moment I can’t say what was the moment, which forced me to switch to ZSH, I assume it was as always. I was extremely busy with some work, but lazy to do it, so I was browsing internet.

Many different articles were referring to ZSH and the terminals on the screenshots with many custom functions looked always great. So I decided to give it a try.
My config is as follows:
- For many years I was using iTerm - usually in the latest beta
- I use zsh from brew
- Oh My Zsh is installed by running commands shown on their page
- The theme is powerlevel10k

And here is the config in greater details…
iTerm
You need some custom fonts in order to use fancy console tricks. I use MenloLGS NF as recommended in powerlevel10k theme. Later I noticed that option Use build-in Powerline glyphs in Profiles -> PROFILE -> Text generates even nicer output. So test it… Rest of the iTerm configuration is not so important, find a color theme of your choice and enjoy.
Oh My Zsh
The main configuration is in the .zshrc file in your $HOME folder. The important parts of it you can find below with the comments:
# powerlevel10k theme
ZSH_THEME="powerlevel10k/powerlevel10k"

# Uncomment the following line to enable command auto-correction.
ENABLE_CORRECTION="true"

# Custom plugins to expand ZSH functionality
plugins=(
  git
  docker
  docker-compose
  zsh-autosuggestions
  zsh-syntax-highlighting
  osx
  colorize
  autojump
)

# fix error outout related to permissions when using sudo - this one has to be before the line "source $ZSH/oh-my-zsh.sh"
ZSH_DISABLE_COMPFIX="true"

source $ZSH/oh-my-zsh.sh

# you need to specify this one in order to use colorize plugin
ZSH_COLORIZE_TOOL="pygmentize"

# shorten the $PATH in the $PS1 for long paths
POWERLEVEL9K_SHORTEN_DIR_LENGTH=2

# Add some colours for directory listing
export CLICOLOR=1
eval $(gdircolors ~/.dircolors/dircolors.ansi-universal)
alias la='ls -A'
alias ll='ls -alF'
alias ls='gls --color=auto' # don't forgot to install gls from brew

# Add some colours for generic utilities
alias colourify='/usr/local/bin/grc -es --colour=auto' # again, don't forget to install if from brew
alias df='colourify df'
alias diff='colourify diff'
alias dig='colourify dig'
alias gcc='colourify gcc'
alias head='colourify head'
alias ifconfig='colourify ifconfig'
alias mount='colourify mount'
alias netstat='colourify netstat'
alias nmap='colourify nmap'
alias ping='colourify ping'
alias ps='colourify ps'
alias tail='colourify tail'
alias traceroute='colourify /usr/sbin/traceroute'

alias hosts='sudo vim /etc/hosts'

# xmllint like jq
alias xq='xmllint --format -'

# Folder Aliases
alias icloud='cd ~/Library/Mobile\ Documents/com~apple~CloudDocs/'
alias coding='cd /Users/erkac/Documents/Coding'

# netris
alias tetris='ssh netris.rocketnine.space'

# python
alias python='/usr/local/bin/python3'
alias pip='/usr/local/bin/pip3'

# DevOps
alias tf='terraform'
alias ap='ansible-playbook'
alias c='code .'

# Weather
function weather {
    curl wttr.in/$1
}

# Crypto
function crypto {
    curl -A cURL EUR.rate.sx/$1
}

# git
function git-upload {
    git add --all
    git commit -m ${1:-random update}
    git push -u origin master
    git pull
}

function gitignore {
    echo "
# General
.vscode
.env
.DS_Store

# Terraform
.terraform
*.tfstate*
*.tfvars
*.tfplan
!*-example.tfvars

# Configs
config.env.sh
00_environment.sh
do-vlab-full.json

# Ansible
hosts
" > .gitignore
}

# osx plugin help
function finder {
    echo "
ofd         - Open the current directory in a Finder window
pfd         - Return the path of the frontmost Finder window
pfs         - Return the current Finder selection
cdf         - cd to the current Finder directory
tab         - Open the current directory in a new tab
split_tab	- Split the current terminal tab horizontally
vsplit_tab	- Split the current terminal tab vertically
pushd       - pushd to the current Finder directory
quick-look	- Quick-Look a specified file
man-preview	- Open a specified man page in Preview app
showfiles	- Show hidden files in Finder
hidefiles	- Hide the hidden files in Finder
music	    - Control Apple Music. Use music -h for usage details
rmdsstore	- Remove .DS_Store files recursively in a directory
btrestart	- Restart the Bluetooth daemon
"

### Fix slowness of pastes with zsh-syntax-highlighting.zsh
pasteinit() {
  OLD_SELF_INSERT=${${(s.:.)widgets[self-insert]}[2,3]}
  zle -N self-insert url-quote-magic # I wonder if you'd need `.url-quote-magic`?
}

pastefinish() {
  zle -N self-insert $OLD_SELF_INSERT
}
zstyle :bracketed-paste-magic paste-init pasteinit
zstyle :bracketed-paste-magic paste-finish pastefinish
### Fix slowness of pastes

# To customize prompt, run `p10k configure` or edit ~/.p10k.zsh.
[[ ! -f ~/.p10k.zsh ]] || source ~/.p10k.zsh

}
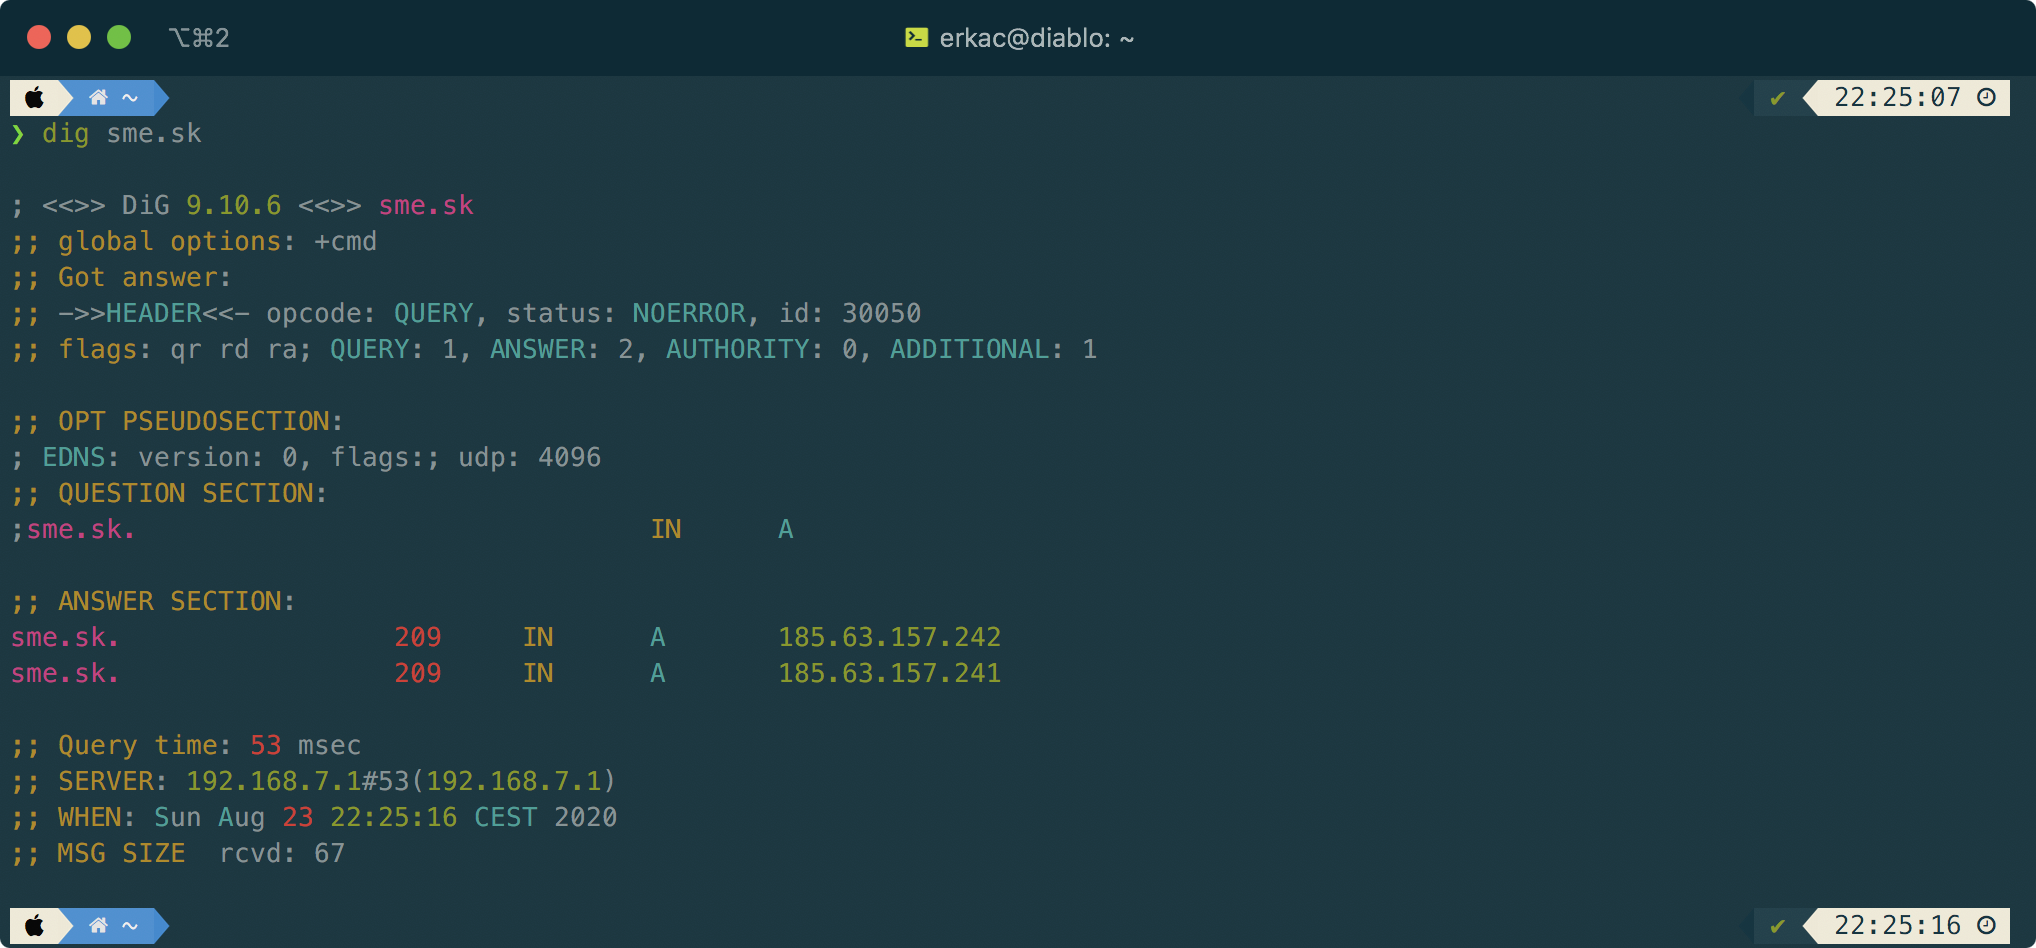
The example of grc command output:

p10k theme
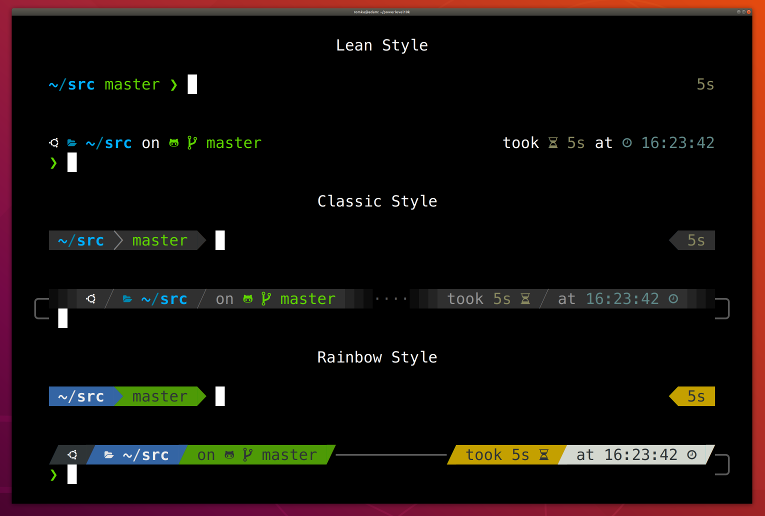
This theme can be configured by p10k configure command. You can see different options how to customize your prompt below:

I do prefer a single line prompt with details like user, hostname and path on the left side and some more data (like date, execution time, git, temperature on the right side of the prompt.
The main configuration of p10k is in the .p10k.zsh file. For me the most important variables are POWERLEVEL9K_LEFT_PROMPT_ELEMENTS and POWERLEVEL9K_RIGHT_PROMPT_ELEMENTS where you can specify what data and in which order you want to see in the prompt.
  typeset -g powerlevel9k_left_prompt_elements=(
    os_icon                 # os identifier
    dir                     # current directory
    #vcs                     # git status
    # prompt_char           # prompt symbol
  )

  typeset -g POWERLEVEL9K_RIGHT_PROMPT_ELEMENTS=(
    vcs
    status                  # exit code of the last command
    command_execution_time  # duration of the last command
    background_jobs         # presence of background jobs
    direnv                  # direnv status (https://direnv.net/)
    asdf                    # asdf version manager (https://github.com/asdf-vm/asdf)
    virtualenv              # python virtual environment (https://docs.python.org/3/library/venv.html)
    anaconda                # conda environment (https://conda.io/)
    pyenv                   # python environment (https://github.com/pyenv/pyenv)
    goenv                   # go environment (https://github.com/syndbg/goenv)
...
…and that’s it folks… I wanted this to be the best possible article about your console tuning, but as I can see it now, it requires much more work… So I assume I’ll keep it updating in the future.